The rye grass we planted in June as a cover crop came up nicely in the “back 40”. It is an annual grass that won’t come back in the next spring.
Our goal was to plant a turf grass that would grow in the mix of sunny and shady areas, be somewhat tolerant of not being watered, and be tolerant of less frequent mowing.
The fellow at the Vermillion Elevator where I have been buying grass seed and fertilizer from in the past suggested three different grass seed mixes which got blended to make the 400 lbs of seed we needed for the “back 40”.
I contacted a fellow with a seeding implement for his tractor and made arrangements with him to come and plant the seed as late as possible before we left for Alabama.
After the rye grass was removed it looked like this.
I spent about three weeks raking up the remains of the rye grass and then loosening up and smoothing the top layer of dirt to get ready to plant the grass seed. After many more passes raking and smoothing, and picking up endless sticks and rocks it was ready.
In early November it was planting day.
We started by spreading a starter fertilizer over approximately 1 acre we were going to seed.
Jeff got his tractor off his trailer and loaded up the grass seed. It held about 100 lbs at a time.
The seeder has a front roller with bumps on it. The pattern it makes looks just like a waffle. The seed is in a container behind the front roller and the rear roller. As he drives forward the seed drops into the waffle pockets. And the rear roller with the same pattern of bumps on it but shifted a bit to the right rolls offer the pockets with seeds. It makes a new pattern of pockets that fills in the seed pockets from the first roller, presses the ground down, and leaves a waffle pattern to catch water.
Jeff went back and forth East and West and then North and South. On the hill behind the barn, we spread a layer of straw to help prevent erosion.
This is called dormant seeding. The fertilizer and seed are put in place just before winter sets in. The ground is too cold for the seeds to germinate. Winter comes, the ground freezes, and it snows. And when spring comes, the snow melts and moistens the ground. The ground gets warm and the seeds germinate. Grass grows.
My neighbor, Dan, sent a picture of the “back 40” in early April.
Our new grass is beyond the trees with leaves around their bases. It is green!
So after all of the tree removal and months of work out in the “back 40,” it will look pretty nice. There is just more to mow. And room for Maggie to explore.
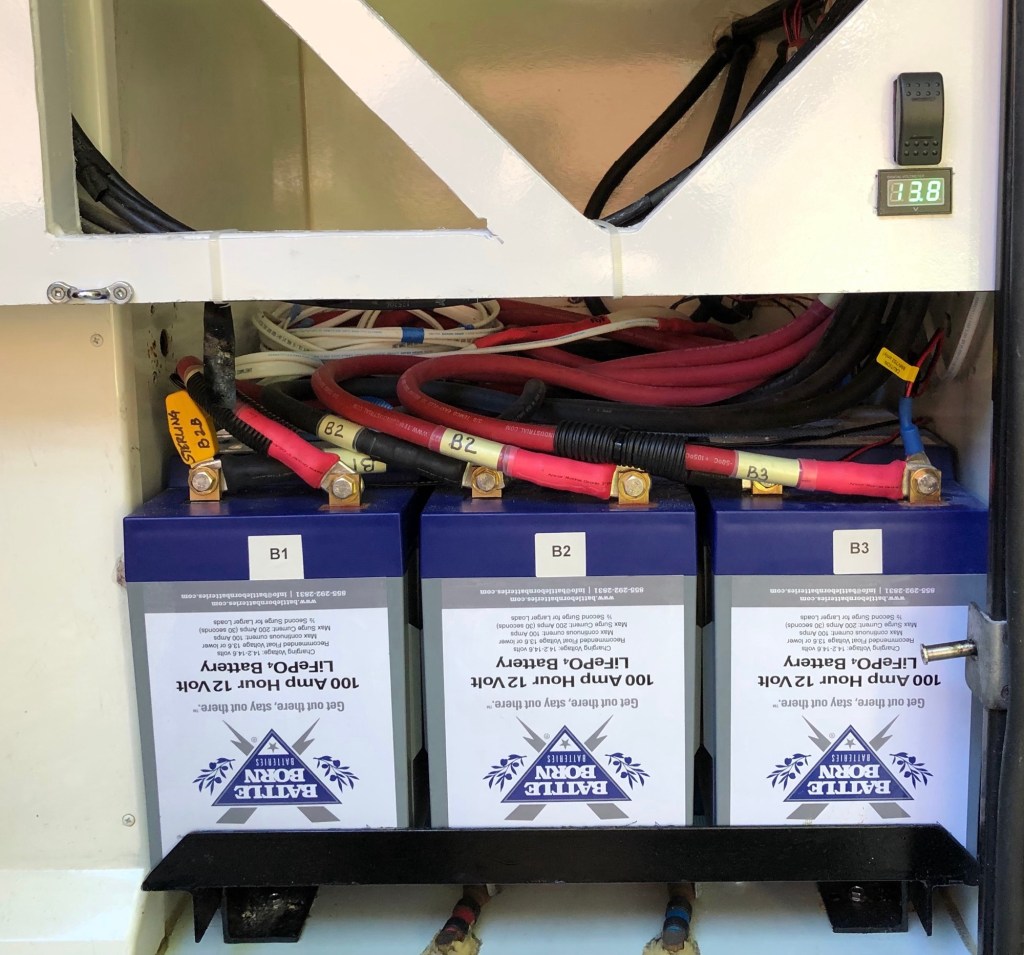
Several years ago we added 1200 watts of solar panels to our coach and 6-100 amphr LiFePO4 Battleborn Batteries. These changes included a Sterling 60-amp battery-to-battery charger, a 120V Sterling 40-amp battery charger, a Victron Multiplus 3000VA inverter/charger, Victron solar charge controllers, and new wiring and controls to improve safety and system management.
The solar chargers and the 40-amp Sterling battery charger are configured to charge both the house batteries and the start batteries.
The battery-to-battery (B2B) charger takes 12-volt power from the engine-driven alternator when the engine is running and charges the lithium batteries with a limited amount of power in a multi-stage charging process. Lithium batteries will generally take all the power that is available when charging and that often overloads the alternator. The B2B chargers manage alternator loads and lithium battery charging rates.
We were fairly early adopters of the lithium battery technology and were amazed at the improvement in available power compared to our then 7-year-old Lifeline AGM batteries. We had essentially doubled the available time we could spend running on just batteries. The solar panels were able to recharge the Lithium batteries for each day’s use on most days.
In 2024 I increased our solar capacity to 1800 watts. I could have gone to as much as 2500 watts if I had replaced all of my existing panels with newer and more powerful panels. But that meant much bigger solar chargers, bigger wiring, new fuse blocks, and combiners. A lot of time and expense.
1800 watts of solar is sufficient to recharge our normal power consumption (about 3800 watts) for about 9 months of the year. In the winter months, the power the panels produce is less (shorter days, lower sun angle) but still enough to put most of what we use in a day back into the batteries. On some days, it will recover all of our usage.
Our off-grid time is mostly in the summer and generally at higher elevations. We have gone as long as eight days with nothing but solar to recharge our batteries. During this time we ended up about 15% short of full recovery for all usage by the time we left. And we had two rainy days in those eight days.
It was an amazing stay.
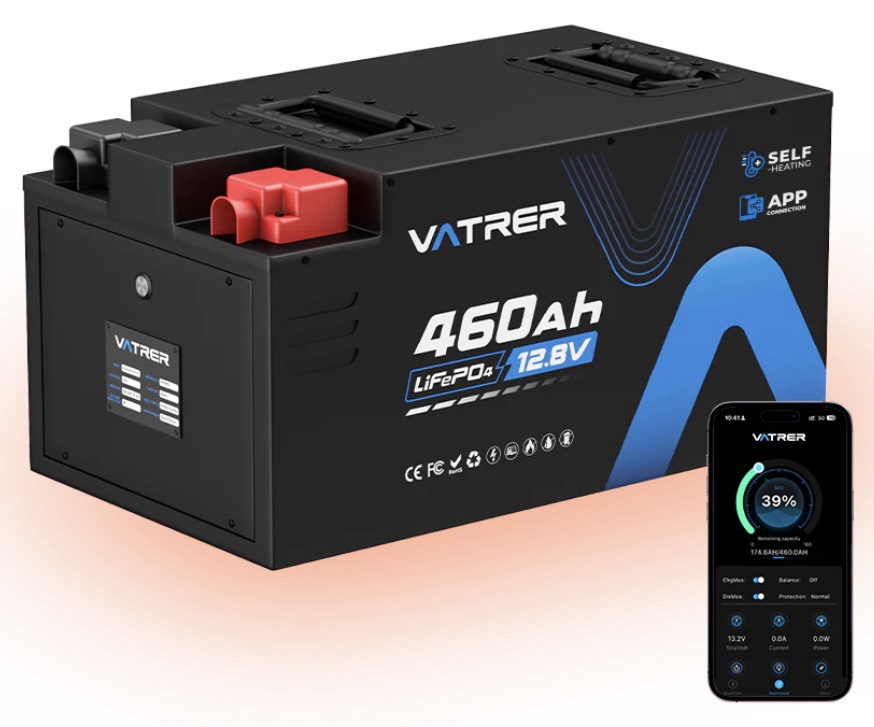
Lithium battery technology has improved since our original installation and prices have come down by about a factor of four
Vatrer Batteries makes a 300 amp-hour drop-in replacement for 8D AGM batteries. They also make a 460 amphr battery that will fit into the existing Foretravel battery racks with some minor modification. These have steel cases, Bluetooth connection, a more robust management system, and an on/off switch. You can get them with internal heaters for extreme conditions. We have never seen conditions in our battery bay where there has been a need for battery heaters.
I bought two Vatrer 460 amphr batteries in January 2025 and had them delivered to my neighbor at home. I was going to keep my 6 BattleBorn batteries and make a second battery bank using the 2 Vatrers batteries. This was a fairly complicated project. I had to make a new battery rack, wire up new switches, fuses, and electrical bus bars. And make lots of new cables.
I was explaining all of this to someone and they asked why I didn’t just sell my Battleborn batteries to someone and use the Vatrer batteries in the existing battery bank. I didn’t think I would find a buyer for them but as soon as I looked for a buyer, they got sold.
So I ordered a third Vatrer 460 amphr battery and a few more parts I needed to use three Vatrer batteries in my house battery bank.
In August, my friend Dave came to Hastings. His coach is the same year and length as ours. We removed his old AGM batteries, his original battery racks, and the LP tank.
We removed the Battleborn batteries from my coach as well as the panel with the switches, fuses, battery shunt, and bus bars, and the battery rack that held the Battleborn batteries. We also removed the panel with the Sterling battery-to-battery charger.
We reinstalled all of these components in Dave’s coach. It was pretty easy to do, everything just fit in his coach as it had in ours. We made a few new cables for the battery-to-battery charger and installed that in the bay where his big LP tank had been.
This swap doubled his battery capacity compared to what he had, improved his charging capacity while he drove, improved safety, and added much more useful information about his battery state of charge status.
We double checked everything, turned it all on and it was working as expected. We started up the coach’s engine and checked the charging through the Battery to Battery charger, it was about 55 amps. Just what was expected.
So Dave had a new house bank of Lithium batteries for not much more than he would have spent on a new set of Lifeline AGM batteries with about half the capacity of the lithium batteries. And the lithium batteries will last about three times as long as the Lifeline batteries would have.
So, if you need to replace batteries in your RV, lithium batteries provide more capacity, longer life expectancy, and more reliability and safety. And they are much cheaper over time than AGM or GEL batteries. You are very likely to never have to buy batteries again.
I modified the Foretravel battery rack to fit the Vatrer batteries, I needed an extra half inch in the lower rack to fit the batteries crosswise (side to side) rather than lined up with the length of the coach. This made the battery connections much easier and provided better access to the batteries built-in on/off switch.
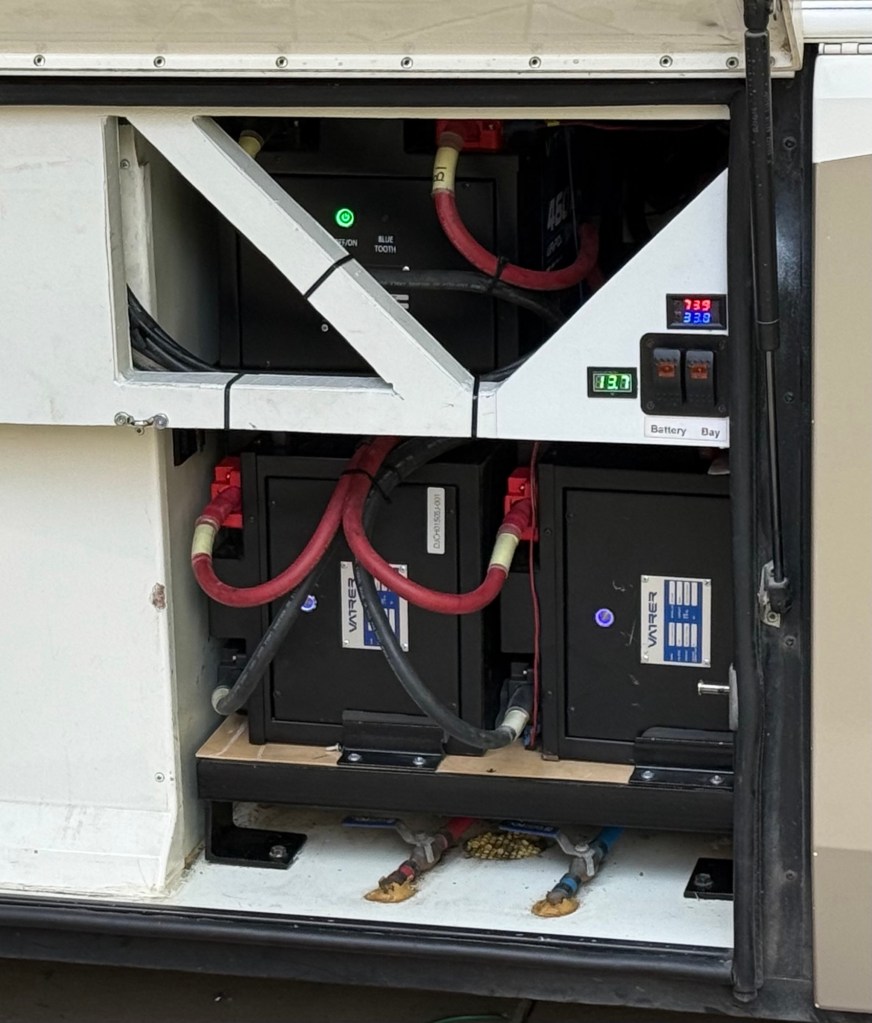
The upper battery is mounted with the terminals facing up. The lower batteries are mounted on their sides with the terminals facing the front of the coach.
All of the plus and minus 3/0 battery cables are equal in length within 1/8”. They connect to the plus and minus bus bars. Each bus bar is followed by a disconnect switch. The plus side continues on with a 400 amp fuse and then to the coach common plus distribution point. The negative side continues on through a Victron Smart Shunt and then to the coach’s common negative distribution point.
The green digital meter is the battery voltage. The red digital meter shows the temperature in the battery bay. The blue meter shows the lower temperature at which a temperature controller powers the fans that move warmer air from the AquaHot bay into the battery bay.
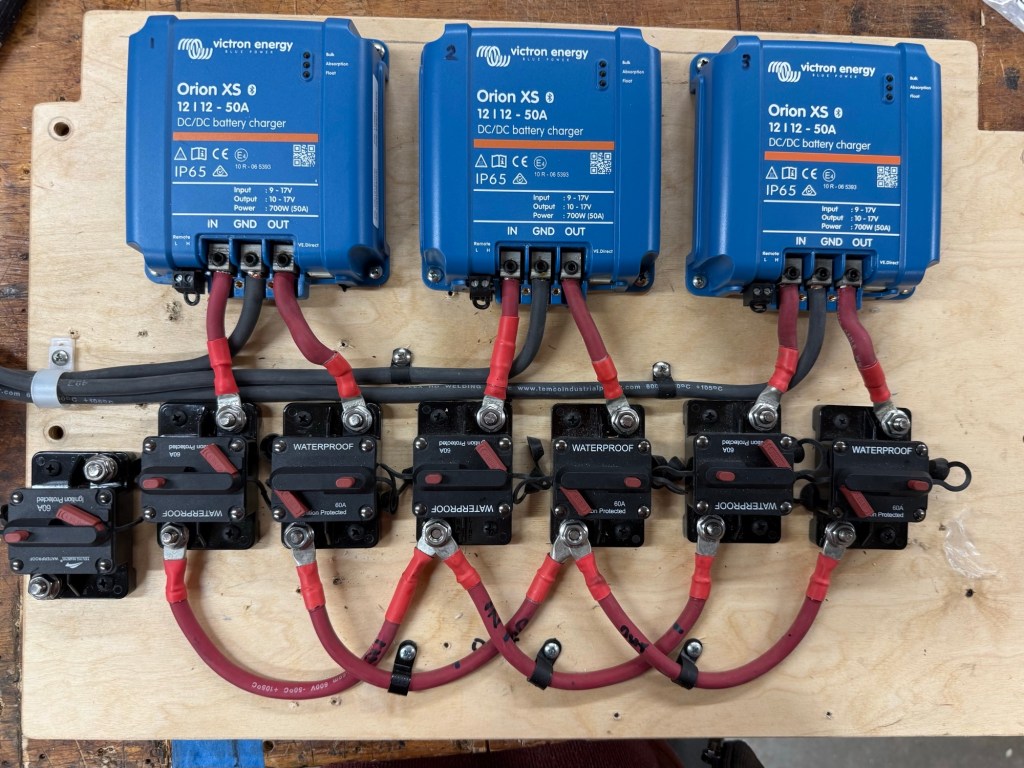
There are three Victron 50-amp battery-to-battery chargers on the back wall of the bay where the original LP tank was located. The B2B chargers were mounted on a panel in the shop. This makes it much easier to install in the coach, just mount the panel and hook up just a few cables.
Once everything was connected connections were tested, the output of each battery to battery chargers was confirmed and the chargers were turned on to bring all of the batteries to 100% charge.
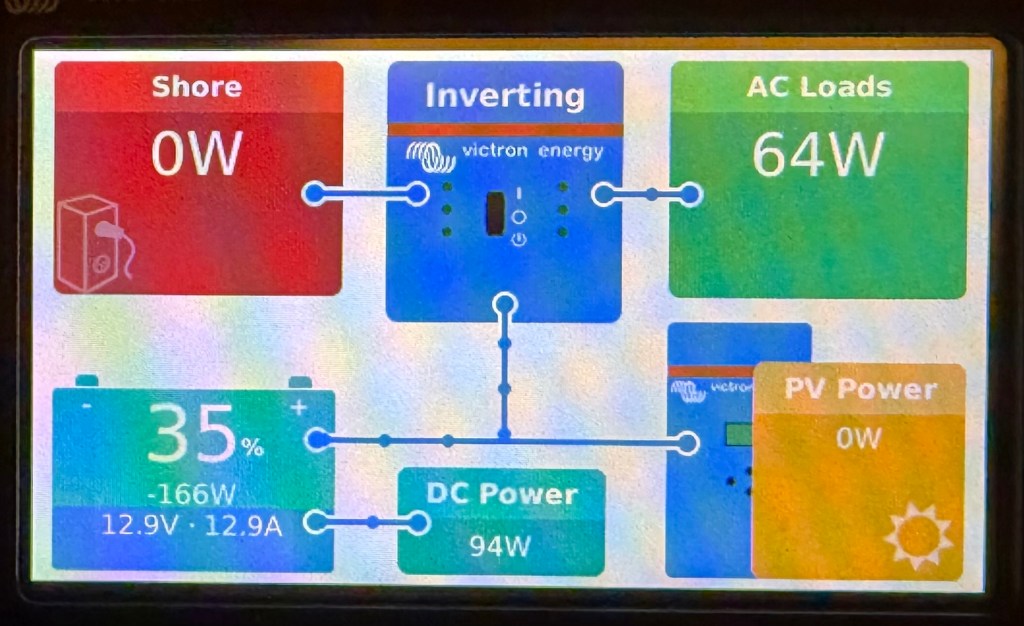
I wanted to run an endurance test. The coach was in the barn so no solar power. The landline connections to the coach were disconnected. The refrigerator was on, the basement freezer was on, the AquaHot heat was on, the lights were on, and the internet electronics were on. The inverter was on supplying 120v power. This is a pretty complete basic load on the batteries.
The timer started. 72 hours later the battery bank capacity was at 35%. There was enough left to go another full day and still have about 14% of total capacity remaining.
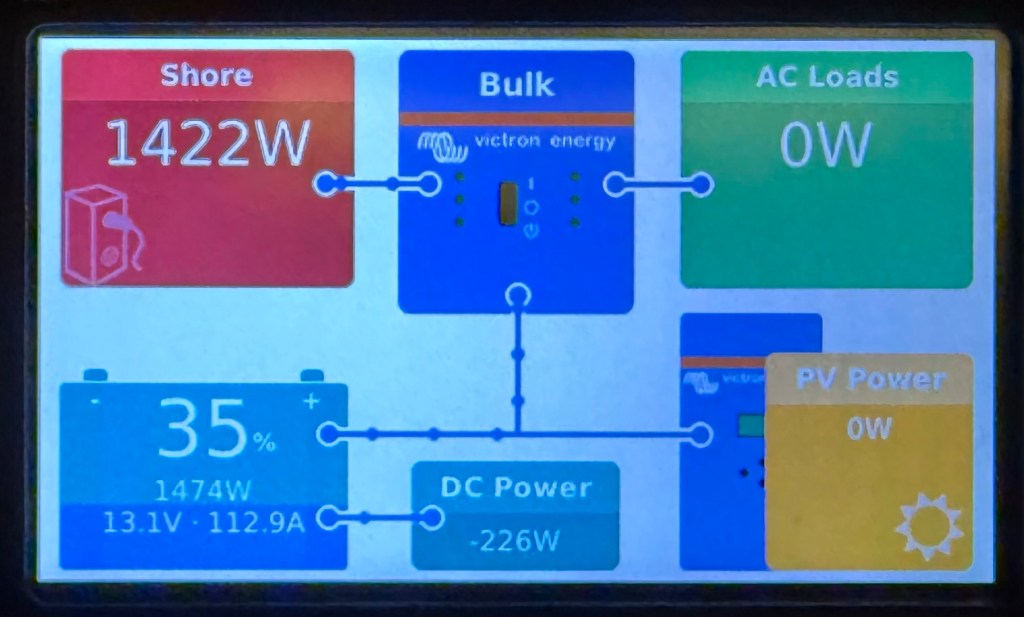
I reconnected the landline. The 120v loads switched to the landline and the inverter quit inverting. The charger started Bulk charging. The 40 amp charger came on as well. The two chargers were adding a net 1474 watts (113 amps) into the house battery bank.
The charging rates and voltages change as the batteries return to full charge.
This was a pretty good test, I was pleased with the performance.
When we left for Alabama in November we stayed at Walmart’s for the first four nights. When we arrived at Walmart each night the batteries were at 100% charge from Solar charging and the Battery to Battery chargers. And then from about 4PM to around 9AM when we left in the morning we would use about 15-18% of battery capacity. We made coffee with the coffee maker, cooked with the induction cooktop, used the microwave, and ran the refrigerator and freezer in the coach and the freezer in the basement of the coach.
Once we started driving the batteries returned to 100% charge usually by noon.
In Orange Beach, all battery charging is being done by the solar panels. And all 12-volt loads are being supplied by the lithium batteries. We use as much as 4% of our battery capacity overnight and that is usually recovered by 10AM.
The Vatrer batteries have an expected life of 5,000 charge cycles. Each cycle is 100% charge to 0% charge and back to 100%. If we used 50% of our capacity every day and recharged to 100%, that would be 1/2 cycle per day. For 5,000 cycles we should get 10,000 days. That is 27 years. We won’t ever have to buy batteries again. And not the next owner either.
Here comes a bit of techno-babble. It is more to document what we did than anything else.
Last fall while we were in Nacogdoches, TX, I took some time to look closely at the 24-year-old exhaust system on the coach. There was one junction between a 5” exhaust pipe and the main muffler where a hanger had completely rusted away and quite a bit of the joining parts were rusted. And I found several small holes as well, almost all were in welded seams.
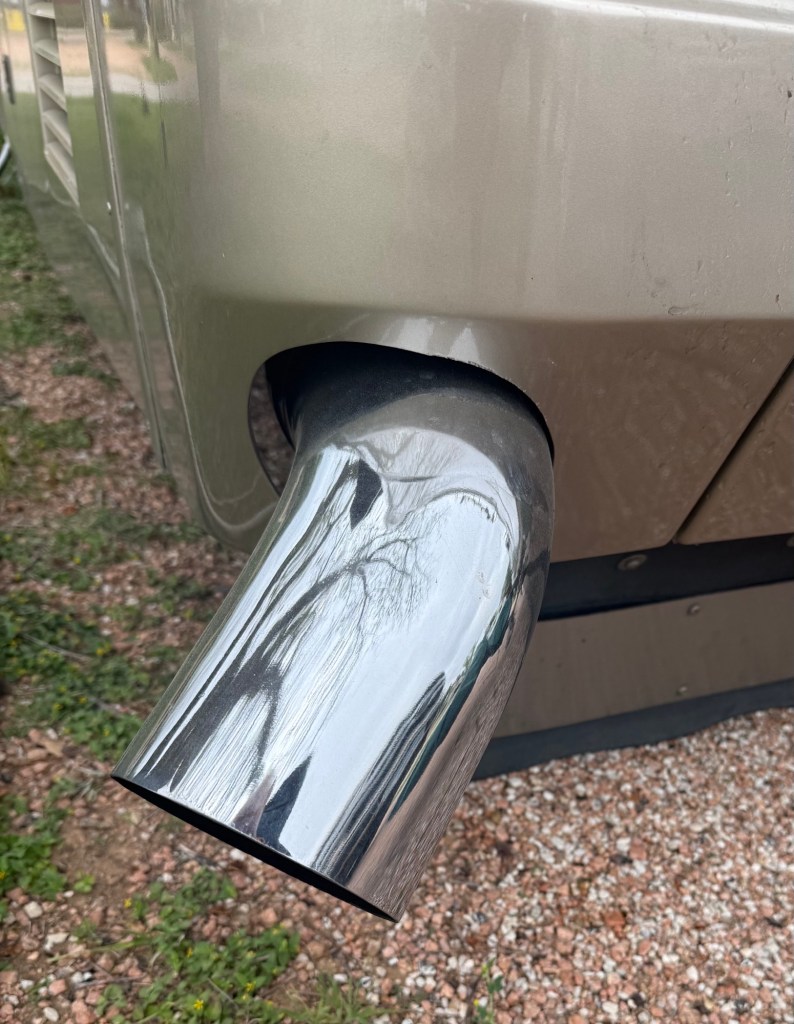
And the year before, the 5” diameter chrome exhaust pipe tip just fell off after the steel pipe it was connected to rusted through and the hanger failed.
We got an on-the-road fix for the exhaust tip, but not before the hot exhaust melted some wire cover and damaged a tail light.
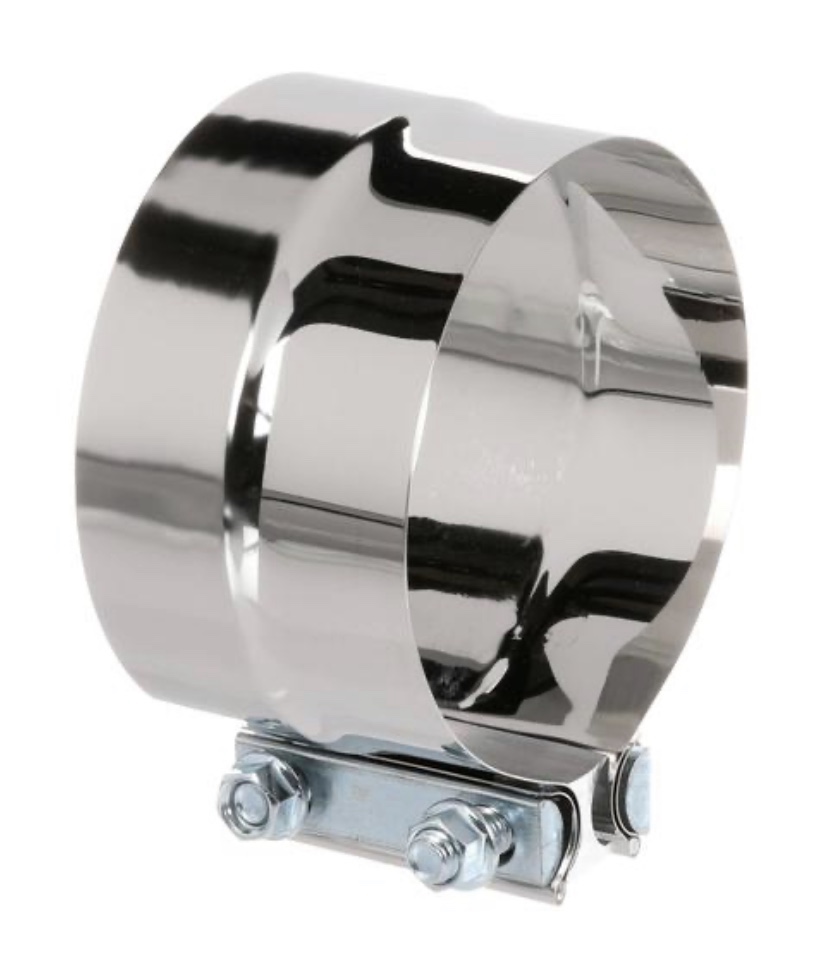
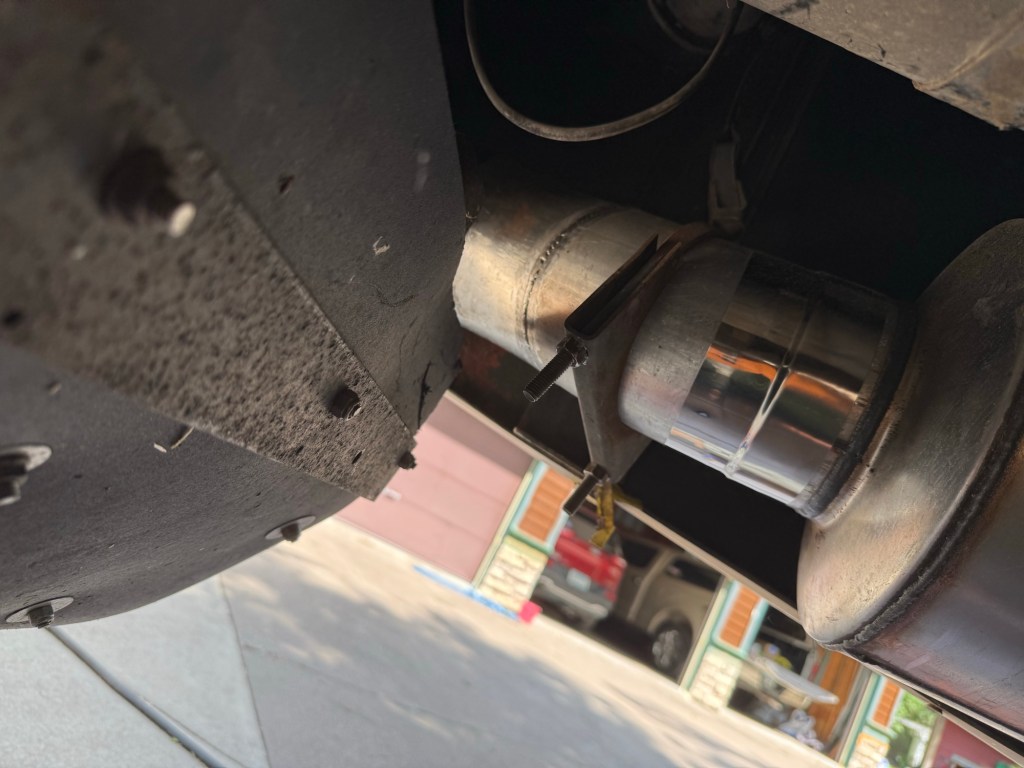
While in Nacogdoches, I removed the rusted hanger and put a 5” band clamp pipe connector over the rusted pipes and a new hanger.
These worked well. I used a generous amount of red high-temperature silicone sealant and the clamp to hold the rusted parts together and give me a place to attach the replacement clamp.
I sealed up the small holes as best I could with sealant and off we went.
So a new muffler was another line item on the summer’s projects list.
The common way to replace the original Foretravel muffler (which is the size of a small trash can) is to route some 5” flex pipe to a resonator and then out through the rear end with a new exhaust tip.
The resonators are mostly about 16 inches long and make the noise level of the exhaust system significantly louder than the original system. I know several people who have gone that way and I didn’t like the extra noise especially when you are starting up and departing a campground.
So I started looking at other options. One might have been to put two short resonators end to end. I found no one who had done that or any reports of noise reduction.
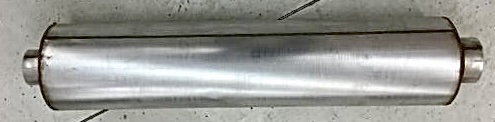
I then found truck mufflers made by Donaldson. They had 5” inlet and outlet pipes. The body of the muffler was about 45 inches long. These came in different materials from steel to stainless steel and different levels of sound attenuation.
I spent quite a bit of time under the rear corner of the coach measuring and visualizing how the exhaust system would work.
I decided it would work so I ordered the stainless steel muffler with the greatest sound attenuation and all of the parts I thought I would need to get this project done.
Once everything was delivered and the weather looked clear for a few days I slipped this project in while still working on the tree clean-up project.
The exhaust from the engine turns the turbocharger which increases the pressure of the air going into the engine. After the turbocharger, the 5-inch exhaust pipe turns 90 degrees and points down, and then another 90 degrees and points towards the side of the coach.
My idea was to add another elbow to turn the exhaust pipe so that it pointed forward and then add a 180-degree U-shaped pipe to turn it back towards the rear.
All the measuring and planning help, but when it comes to actually fitting parts together there is always a lot of trimming and fitting to make it happen the way you want.
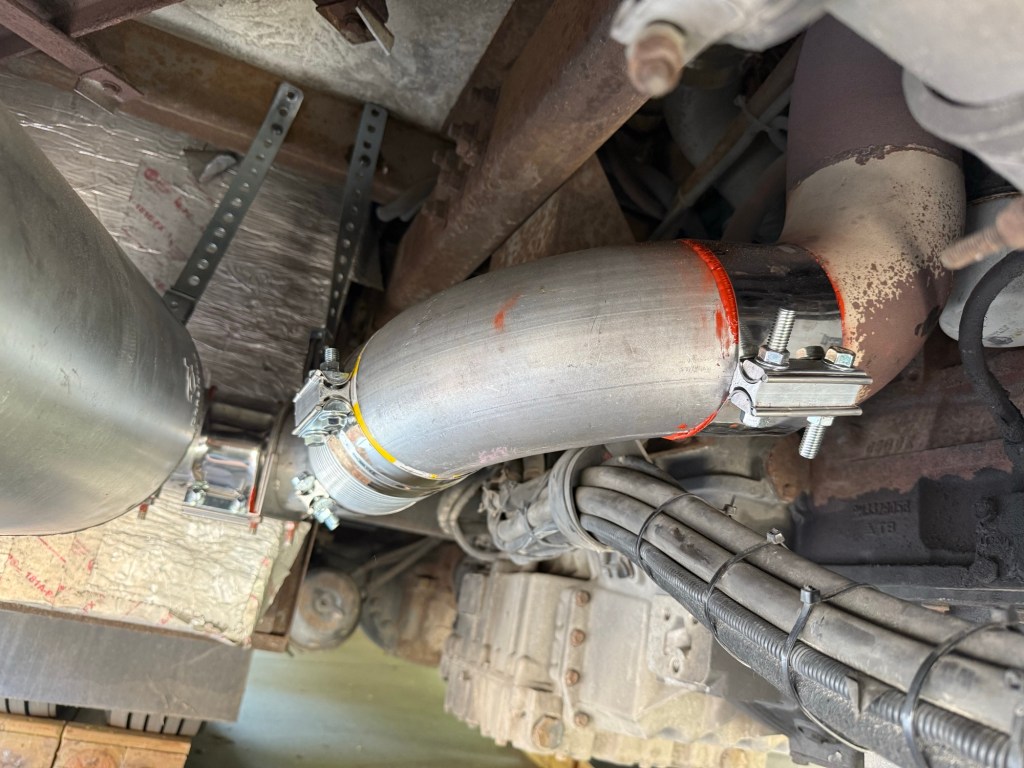
I cut off part of the elbow pointing to the side of the coach so that the next elbow pointing forward would be lower. I used a 5-inch pipe to join two pipes of the same size butted up to one another. This was sealed up using a generous amount of red high-temp sealant. When this is all tightened up and the sealant cures it is a rock-solid connection.
The U-shaped pipe would connect to the front of the muffler. At the rear of the muffler, there needs to be a 5” offset S-shaped pipe that connects to the chrome exhaust tip which goes through a hole in the coach body.
I assembled the U-shaped pipe to the muffler and the S-shaped offset pipe to the other end of the muffler and then propped it up in its approximate position to see how it was going to fit. I needed clearance where the muffler went by the air conditioner cooling fan, it needed to line up with the hole in the back of the coach, and the U-shaped pipe needed to line up with the elbow pointing forward.
A few adjustments later I had it lined up pretty well and determined I needed to add a section about 8 inches long to make everything fit. That is where a section of stainless steel flex pipe and a couple of additional clamps come in handy.
You can see in the picture above the flex section connected to the U-shaped pipe which is connected to the muffler. The U-shaped piece was made from two ninety-degree sections cut to fit and welded together. I put another connecting clamp and plenty of sealant over the welded joint to make sure it sealed up.
There are a pair of pipe clamps there too which hold one end of the hanger straps to support the front end of the muffler and assembled pipes. The straps are anchored to the coach frame above.
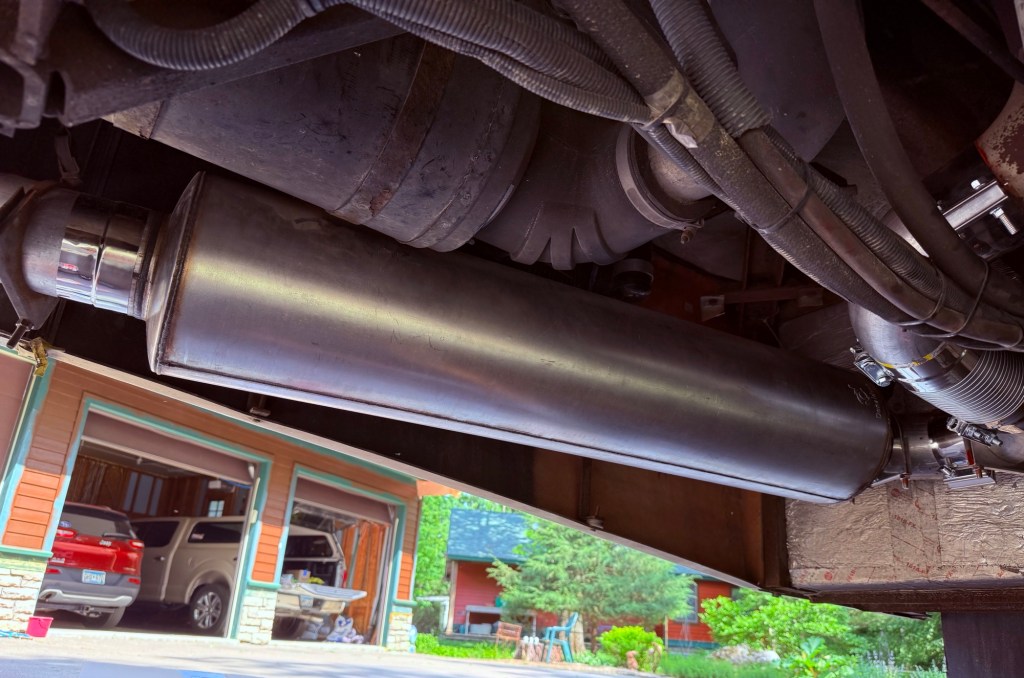
Now you can see the ten-inch diameter muffler heading towards the rear of the coach. The five-inch offset pipe is connected to the rear of the muffler with another pipe band clamp. There are two more hanger brackets attached just to the rear of the band clamp.
This is all pretty close fits. You don’t want anything shaking or loose, nothing too close to anything else that might not do well if it got too hot, and the exhaust tip has to come out through the hole at the rear of the coach with clearance all around.
The exhaust tip is not quite centered in the hole but there is clearance all around. I needed more clearance near the AC fan shroud. An extra quarter inch in the offset pipe would have helped. These are some of the fit issues you just can’t see until you start putting things together.
This project took three days to do. I was short a couple of parts and had to order them. The total time was maybe 6 hours. I scraped up a knee, a couple of knuckles, and got dirty. All common results working on under the coach projects.
I double-checked all of the nuts and bolts to make sure they were tight. I drove the coach for about 40 miles to make sure it got warmed up and then tightened everything again. I did the same after a longer drive later in the fall.
Did it work? Nothing fell off and the nuts and bolts are staying tight. It is much quieter than just using a resonator. I think it is about the same noise level as the OEM muffler but that is very subjective. It sounds different from the OEM muffler, I can hear a bit more of a roar going through a tunnel or under a bridge but in normal driving little if any difference.
All of the parts were about $800. I could have saved a hundred bucks or so if I had not used the most expensive muffler. I have several band clamps left over and a hanger clamp. That might be $100 worth of spare parts. Taking the coach to the factory or one of the service places in Nacogdoches to have this done would have been at least $2,000.
Another project checked off the summer list, Bob’s your uncle.