We got back to Hastings in late April. I had a couple simple projects in mind for the coach but mostly wanted to finish a bathroom built-in cabinet that I had been working on for some time.
When we were in Tucson in February we met several other Foretravel folks among them Kent Spears and Ken Hathaway. These are folks we have met before. They had seen an add on Craig's list for pretty cheap solar panels in Las Vegas so they drove over and returned with as many 240 (maybe 270) watt panels as they could cram in Kent's car and promptly put three on Kent's coach and four on Ken's coach as I recall. They had to find mounting hardware, cables to go from the panels to the solar charge controller, the solar charge controller, cables to the batteries and all of the other bits. I got involved about the time they were trying to hook up their laptops to the solar charge controller to see what it was doing. I had some suggestions on small routers. They were pretty excited about it. The cost seemed reasonable. And there is a 30% tax credit based on the cost of the solar installation. Of course by this time all the panels were gone. But in just days another add popped up on Craig's List, Las Vegas, for 300 watt panels. These are placed by the same few people who are liquidating the remaining panels from projects in Nevada that might use 10 or 12 thousand panels at several sites. They always have extras. I called. He had pallets of twenty, more than a hundred pallets. Could he sell me three or four panels and ship them to Minnesota? Nope. He took my name and phone number anyway. A few days later he called back and asked if I would buy ten on a pallet shipped to MN? He knocked $15 off the price of each panel and added about $35 for shipping to my door in Minnesota. These are commercial panels with a 25 year warranty. I said yes if he could hold off on shipping for a month till we got home. It was a done deal.
So now the list of summer projects started to get longer.
If you add solar you need batteries to store the electricity. When we added a residential refrigerator to the coach it was pretty apparent that some additional battery capacity would be nice. The three batteries in the coach now are 6 years old, maybe another year or two left in them. And the common rule is you don't mix batteries of significantly different ages. So all new batteries? Or add more batteries in a separate group? That seemed to make sense. That way all of my batteries wouldn't be aging out at the same time and needing to be replaced all at once.
Our coach has a 17 gallon LP tank to feed the two burner cooktop and the original LP gas refrigerator. Without the LP gas refrigerator that LP tank could be removed freeing up some space for new batteries and a much smaller LP tank that could be removed and taken somewhere to get refilled rather than having to drive the coach somewhere. A 17 gallon LP tank will run the cooktop for at least five years.
We were still using the original inverter/charger with the first house battery set. At 16 years old it was nearing the end if its expected life and it was not as efficient as some of the newer version. A new one with higher 120 volt power output and 20% more 12 volt charging capacity seemed like a good idea. So I found a buyer for the original, still working inverter and added a new bigger inverter to the list. My buyer reports that it arrived in good working order and is working now in his coach.
Ideas were shaping up. I certainly didn't need ten panels so by the time we got home six had been sold. The plan was for three on our coach (if I never wanted to get on the roof again, there was maybe room for five) and one on the roof of the barn to keep batteries charged while the coach was inside. So 900 watts, a possibility of 65 amps of battery charging. The panels will never be perfectly aligned with the sun, there may be clouds or shade from trees. Almost anything can keep them from their maximum potential. But all of the wires, fuses, solar charge controller – everything – has to be sized for the maximum possible power. Realistically over time a days worth of power from the sun will be about 2700 watts going into the batteries or about 210 amp hours. Our refrigerator is the biggest power consumer, an average of 70 watts per hour or about 1850 watts for the day accounting for some inefficiencies in the 12 volt DC to 120 volt AC process. So on average we would be close to self sufficient just from the sun if we are careful with power usage. In practice we probably use a little more. The solar just means we can go for three or four days before we need to run our generator for a couple hours to make up any shortages.
Two years ago I added a bigger 240 amp Delco Remy alternator, plenty big enough to handle more batteries. I also changed the original diode based isolator to a Sterling ProSplitR zero voltage drop isolator. The isolator keeps each set of batteries separated so that charging power goes to all of the batteries but power cannot go from one battery to another. The diode based isolators lose almost 1 volt from the input side to the output side due to the diodes and heat. This makes the alternator work harder and the process less efficient. With a zero voltage smart isolator the alternator or other charging source feeds power to the batteries with almost no losses.
So the project list …
- A new house battery bank, wiring so that they can get charged, switches and fuses and wiring to a high efficiency inverter (change 12 volts DC to 120 volts AC) for the refrigerator circuit.
- A smaller 11 lb (2.6 gal) LP tank and a spare.
- Solar panels with wiring, switches, fuses and a solar charge controller.
- Adjust the wiring on the secondary battery charger.
- Add a distribution point for the solar power.
- Replace the existing monitoring panels with a control panel that integrates all of the components into a single view.
- Remove the original inverter that worked with the first house batteries and replace it with a new, bigger more efficient one.
- Get it done in about 6 weeks
- Keep working on the built-in cabinet
- And sneak in a week long project with Douglas and Amanda to replace their dead inverter and put two solar panels on their coach (an unplanned addition to the list but we enjoyed their visit)
- And still get it done in six weeks
No problem.
Acknowledgements.
If it hadn't been for Ken and Kent none of this might have happened this way. I got lots of help on this project especially from Alan Ferber at Bay Marine Supply in San Diego. He helped me work through all of the possible choices, made good recommendations, helped determine correct wire sizes and frequently helped un-dumbfound this old dog. Barry (Barry and Cindy) from the Foretravel Forum helped with some insights on the 120 volt wiring transfer switches. George D also from the Foretravel Forum gave me ideas on Victron integration. And Don (Don and Tys) another Forum friend has always been there with encouragement. And many others pitched in their two cents. Thanks for the ideas and guidance. All of this is something to learn made complicated by equipment and technology constantly changing.
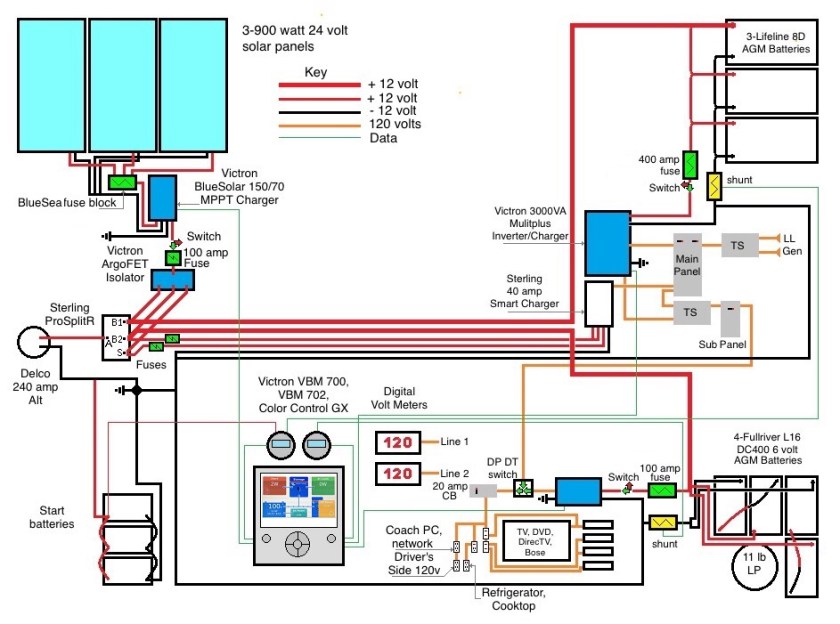
Here is an overall view of the plan. Yah I know, techno-babble sort-of-thing but part of the function of the blog is to keep this record for ourselves and for others who might be more interested.
Parts List.
Victron Multiplus 12/3000/120 inverter charger
Victron Color Control GX
Victron Bluesolar 150/70 MPPT controller
Victron Phoenix 12v / 800VA Phoenix inverter
Victron BMV 702 battery monitor
Victron BMV 700 battery monitor
2 VE.Direct – 10M (32') for small inverter and Blue Solar controller
3 VE.Direct to USB interface for BMV-700 & 702
2 Digital voltage displays
Powered 5 port USB hub
Cat 6 Ethernet cable, 25', Multiplus to Color Control GX
Cat 6 Ethernet cable, 50', Color Control GX to PC Network Gigabit switch
3 MRBF fuse holders for solar and battery charger
MRBF fuse – 80A, solar
2 MRBF fuses – 50A, battery charger
Blue Sea 5025 fuse block, 30 amp fuses
2 BEP Marinco EZ installer on/off battery switch
ANL fuse holder – 750A double stud for house bank
ANL fuse holder – 300A single stud for house bank
2 Link bars – LB1 (switch to fuse)
ANL fuse – 400A for house bank 1
ANL fuse – 100A for house bank 2
Bus Bar – 4-Stud 250 Amp – 5/16, Black
Bus Bar – 4-Stud 250 Amp – 5/16, Red
Sterling ProSplitR Zero Voltage Drop isolator, 210 amp, 3 way
Sterling Pro Charge Ultra Battery Charger, 12 volt/ 40 amp, three output
4 Fullriver DC 400-6 L16 size 6 volt batteries, 415 amp hr.
Battery rack, custom made.
LP tank mount
2 – 11 lb LP tanks
SquareD circuit breaker panel, 20 amp circuit breaker
Double pole Double throw Center off switch. (DPDT)
- Enables choice between the two inverters to power the refrigerator/front end circuit.
Custom made cables by me, I got the really big crimper.
- all with FTZ power lugs or starter lugs,
- hole sizes as required,
- double adhesive lined heat shrink tubing.
2 14" 3/0 6 volt battery interconnect
4 26" 3/0 6 volt battery to bus bar
2 25' 4/0 cables, Sterling ProSplitR to House Battery 2
4 8' 2/0 cables House Battery 1 to Victron Multiplus
Several 8, 6 and 4 gauge cables as needed
2 pair 8 ga solar panel cables, 25', MC4 fittings on one end
1 pair 10 ga solar panel cables,15', MC4 fittings on one end
6 watertight cable bulkhead fittings.
Running the 4/0 12 Volt Cables.
I had to run two new 4/0 cables (four ought is the way wire folks speak). These cables are about the size of a garden hose but are pretty flexible. I had to go from the LP bay down the center of the coach basement through the main bay, through the wet bay (this is where the water and waste tanks are) where one could not see where they were going, out from the basement at the rear, over the rear axle and differential, up and over the transmission and then up into the engine bay. The bed in the rear bedroom sits on a box over the engine. The top of the box and the mattress lift up to gain access to the engine from the top. These big wires needed to get to the front inside end of this box.
The hardest part of this was through the wet bay. The cables go over the the water and waste tank and through a hole at the top of the back wall of the bay. The hole is already pretty full of other cables, hoses and other things and you can't see it from inside. Once through the hole there is a frame member about five inches away that you have to go under. Even from under the coach this is not something you can easily see. So with a long skinny rod with a hook on the end I spent a couple hours trying to get a rope through there and into the small space between the back wall of the bay and the frame member. After many tries and into the basement and out and under the coach and back I finally spied the end of the rope using a flashlight and a mirror on a stick. Then with another stick with a hook I was able to snag the rope and pull it down to an accessible point.
My neighbor, Dan, came over to lend a hand feeding the two 4/0 cables, a red one and a black one, through a small hole in the back wall of the basement, through the wet bay and out the back. The cables were tied to the rope. Dan was feeding them in and covering the cables with an electrical cable lubricant that helps them slide through. This goo is about the consistency of thick hand lotion. I was under the coach (which was on six inch blocks and the air bags up all the way for an extra 10" of clearance) and I started pulling, Dan was lubing and pushing and after a few anxious moments the cables appeared. We pulled about 17 of the 25 feet of cable through which left me enough at both ends. Thanks for the helping hand, Dan.
Then I had to feed the two cables one at a time through all of the cable troughs and supports over the rear axle, over the differential, along the side and above the back end of the transmission and then up and through some tight cable supports that were already pretty full. And every where the red +12 volt cable went through a cable guide it had to have a corrugated plastic cover to prevent abrasion. Finally it was all in place along with a couple dozen stout cable zip ties. I was covered from head to toe with dirt, grease, grime and general filth. And I was bleeding from several small scrapes and cuts on my hands, arms and head. Sorry no pictures. It took about three showers to get sort of cleaned up. And then back into the basement of the coach to finish routing the cables through the overhead cable tray forward and to the right into the new battery bay.
Solar Panels.
Three 900 watt solar panels are on the roof. I had a cardboard cutout the size of the panels to help get them positioned. I had a local sheet metal/welding guy make aluminum mounting brackets. The roof is curved side to side so one part of the bracket is bent slightly more than 90° to fit the curve of the roof. Each bracket is 12" long and attaches to the roof with a double sided 3M VHB tape. This tape is very strong and has 91 psi strength in tension. With four brackets the tape has over 6000 lbs of holding strength, no screws needed.
We employed a well known Egyptian method of getting things from one level to another. The panels weigh about 60 lbs and we had no crane available.
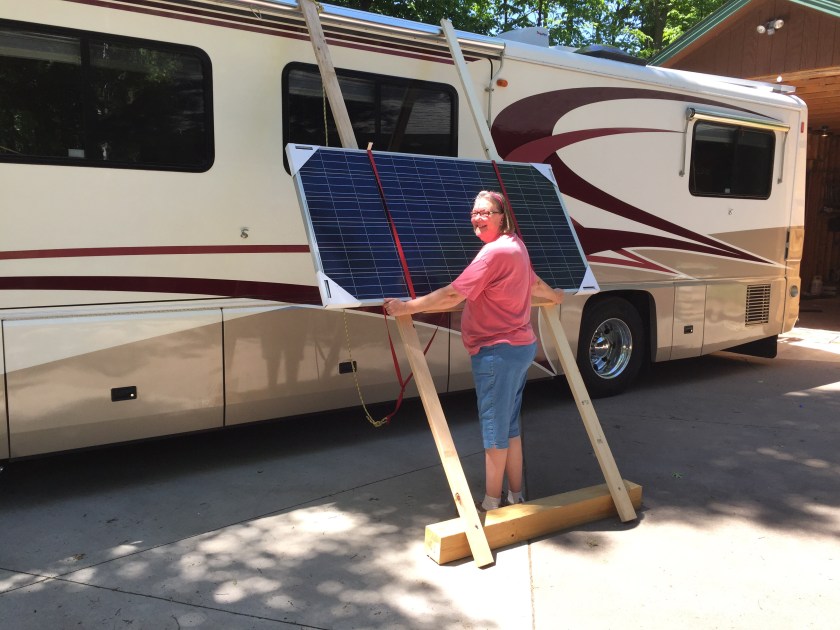
Pull them up one at a time.
The panels with the brackets attached were placed in position. I used blue tape to mark where each bracket sat on the roof. The panels were moved aside and the roof and aluminum brackets were prepped with acetone, denatured alcohol and then a 3M cleaner/adhesion enhancer. The VHB tape was put in place on the roof and pressed into place. Then the backing was removed from the VHB tape. The panels were moved back into position and the brackets set down on the VHB tape and pressd into place.
I left them sit for a couple days and then caulked around all of the bracket edges with 3M 4000 UV adhesive sealant to keep moisture out. I used stainless steel bolts and lock nuts to attach the panels to the brackets. Some folks use Dicor caulk. I have tried it but prefer the 3M product. It seems much tougher, the skin forms and dries quicker so it attracts less dirt and after a couple years it looks cleaner. There are others you could use as well. It is just a choice.
The panels are 24 volts each. A pair of wires (+/-) comes from each panel along the roof hidden and protected as much as possible. I used plastic wire tie attachments stuck to the roof with double sided tape. The solar cables are zip tied to these. It makes for a pretty tidy end result. The solar cables are run through water tight grommets in the side of the refrigerator vent and down into the refrigerator bay behind the refrigerator.
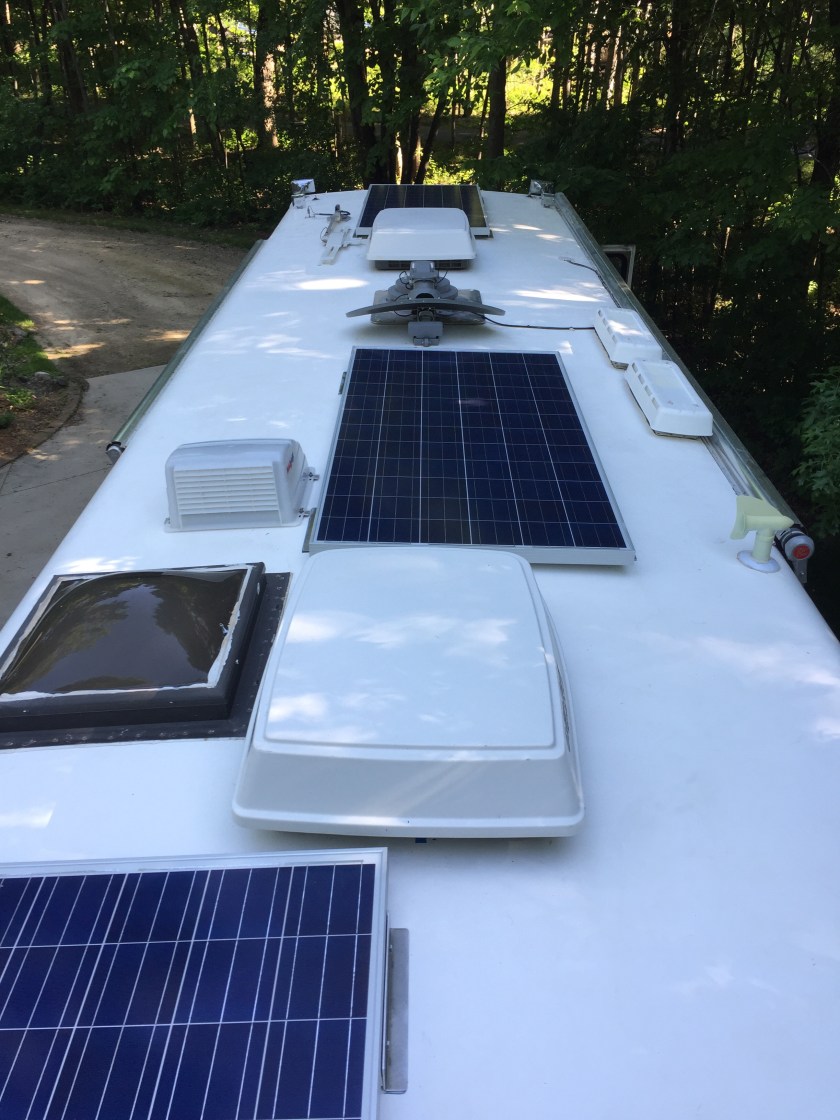
Three Solar Panels
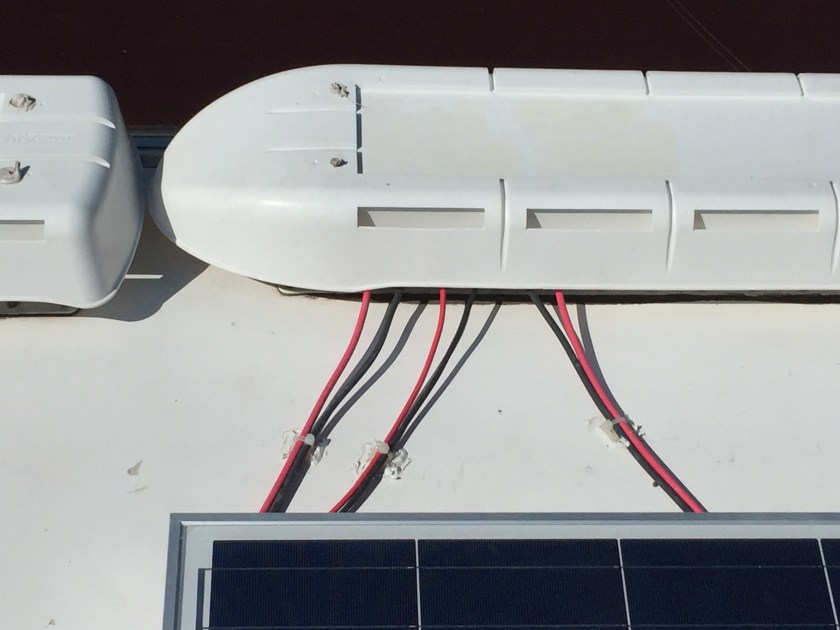
Solar Cables into the Refrigerator Vent
These solar panel wires go through the floor of the coach behind the refrigerator into the passengers side of the wet bay where the water pump and the water distribution manifold are located. I rebuilt the back side of the small storage area to gain some extra room, quite a bit actually. This space is heated in the winter so these wall sections are needed to keep heat in and to help keep things neat. This also gave me the additional room needed for a reserve LP tank.
The 24 volt solar panel wires connect to a Blue Sea fuse block. Each panel has its own 30 amp fuse. The output of all three panels is combined at the fuse block and fed to the Victron BlueSolar 150/70 charge controller using 6 gauge cable. The charge controller converts it to 12 volts which doubles the amps and sends power to the batteries through an on/off switch. For this longer run to the batteries I used 4 gauge cable.
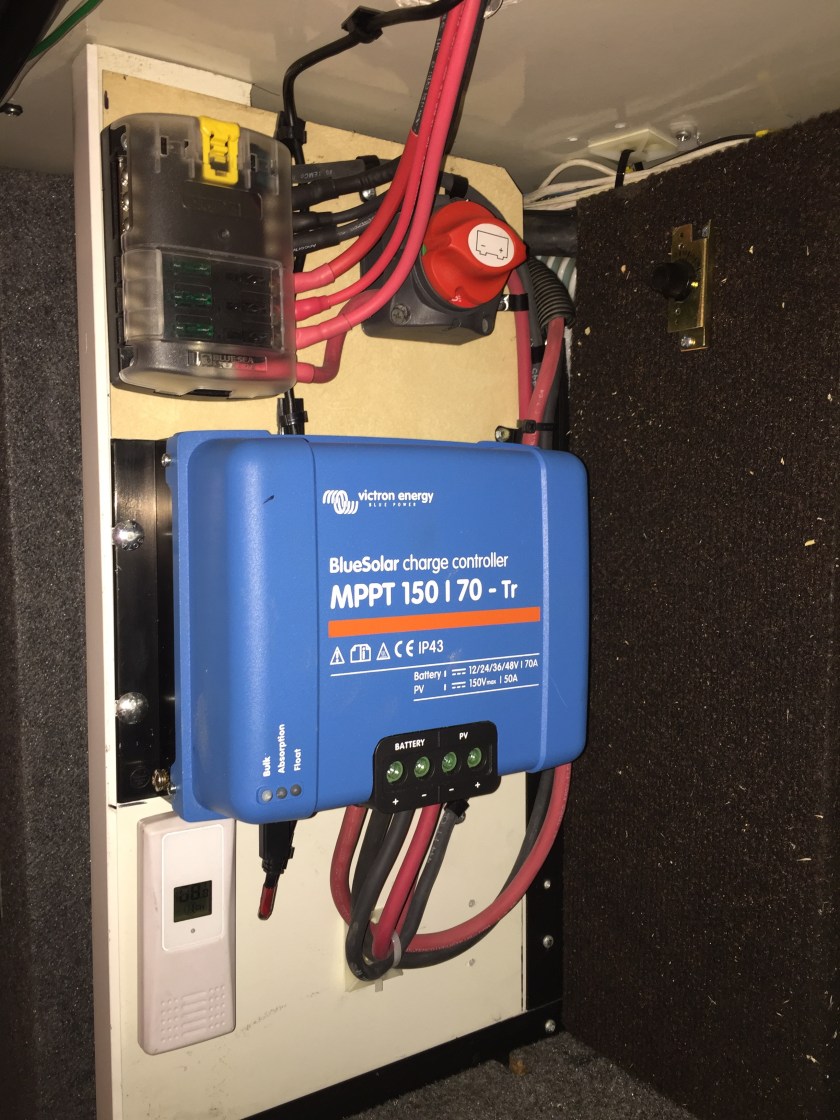
Solar Charge Controller, fuse block, switch, temperature sensor
The charge controller senses the voltage at the battery and adjusts the output voltage. When the batteries need power the output voltage is higher which helps charge the batteries quicker. This is a bulk charge mode. As they become more fully charged the voltage drops and the charge level is reduced as the charger works to get the batteries to absorb as much as they can. This is the absorption mode. Finally when the batteries are fully charged, the voltage drops a bit more and the charge level is reduced even more to just keep the batteries fully charged. This is the float mode. The charge controller has a data cable that goes to the Victron Color Control GX panel where its function can be monitored.
The charger output is fed through a Blue Sea MRBF fuse holder with a 80 amp fuse to the input side of a Victron ArgoFET isolator located in the engine bay on the front inside of the bed box. This isolator has no diodes and no voltage drop. It prevents any interconnection between battery banks but still allows the solar power to go to all three battery banks as needed. Output from the isolator goes to the three distribution points on the Sterling ProSplitR isolator.
My original thinking was to send the output from the solar charger to the input side of the Sterling and let it manage the distribution of power to the different battery banks using its internal management system. That would work but it would mean the Sterling would need to be powered up all the time. This power usually comes from an ignition powered source when the engine is running. That source would need to be isolated with a diode so when the Sterling is powered by a secondary source (solar charger) the engine ignition source is not getting feedback. This got more difficult than I wanted it to be so I just used the ArgoFET isolator. No extra wiring, no diodes. And the Sterling is off except when driving. I would still like to use the smart part of the Sterling, it would do a better job of putting solar where it is needed most. More thinking is required.
A New Battery Bank.
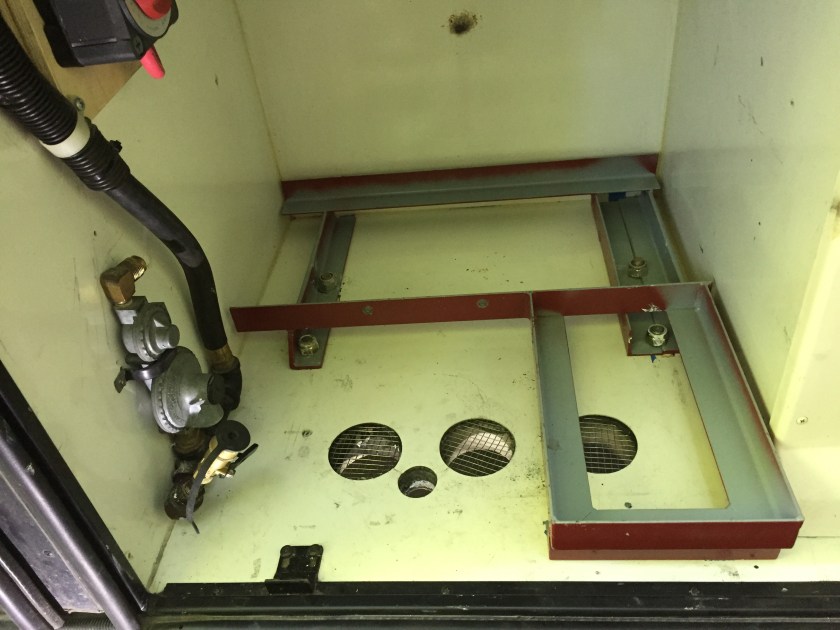
The three coach batteries now are Lifeline 8Ds. These are big (10"x22"x11" high) and heavy (167 lbs). There is room for three of these on two levels on the driver's side. On the other side where the big LP tank is there is the same footprint but not enough height for two levels. So the big LP tank was removed. I had it sold to a fellow in TX but there is no reasonable way to ship a used LP tank. It is considered a hazardous shipment. So that deal fell through.
In that space there is room for four L16 sized batteries, each about 8"x12"x16" tall. Four of these six volt batteries have about 15% more capacity than the three 8D batteries for about the same total weight. I designed a rack to hold the batteries and use the big LP tank mounting holes. The metal guy welded it up.
The Fullriver batteries came from AAA Battery in NE Minneapolis. I picked them up and got 10% off plus a credit for recycling old batteries. In the end it was the cheapest I could find for these batteries anywhere. The batteries got test fit on the rack in the shop. Perfect. The rack got installed with the original bolts that went through the basement floor steel frame. I made bigger plates to fit on the under side of the floor and loaded the plate and bolt hole with a 3M 5200 adhesive sealant and bolted it all together. It should be water tight for ever.
There are four vent holes through the floor. I made a fiberglass cover that fits over all of these vents preventing water or dirt from getting into the new battery area but still allowing for positive ventilation. I made covers for the vent holes in the driver's side battery bay and for the AquaHot Bay vent as well. All of these are glued in place with a 3M 5200 adhesive.
I made a plywood panel to fit on the upper rear wall of the bay. The two bus bars (plus and minus) are attached to the panel as are the switch and fuse block. There is also a shunt mounted just above the negative bus bar. The shunt allows the measurement of amps coming out of the battery. The shunt is between the bus bar and the 4/0 black cable running all the way to the rear of the coach to the common ground point. This ensures uniform grounding through direct cables.
All of the negative battery cables attach to the negative bus bar. The positive battery cables to the positive bus bar. All of these cables from the batteries to the bus bars are the same length. The 4/0 red cable that runs from rear of the coach is connected at this end to the positive bus bar and at the other end to the B2 post on the Sterling ProSplitR. A 4 gauge positive cable from the positive bus bar goes through the fuse and the switch to the Victron Phoenix 800 inverter that powers the refrigerator circuit. A 4 gauge negative cable from the far end if the shunt goes to the Victron Phoenix 800 inverter as well.
Battery Rack
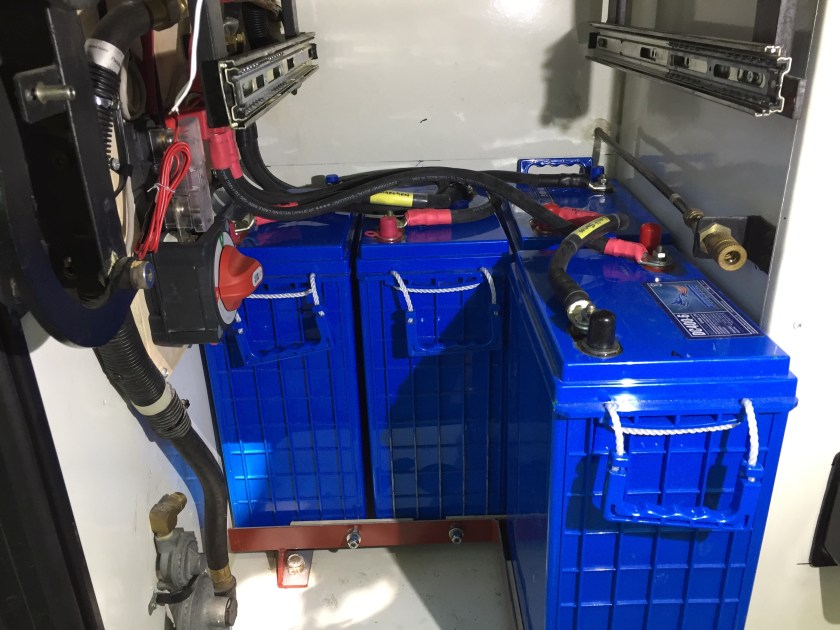
Batteries in Place, Wired up.
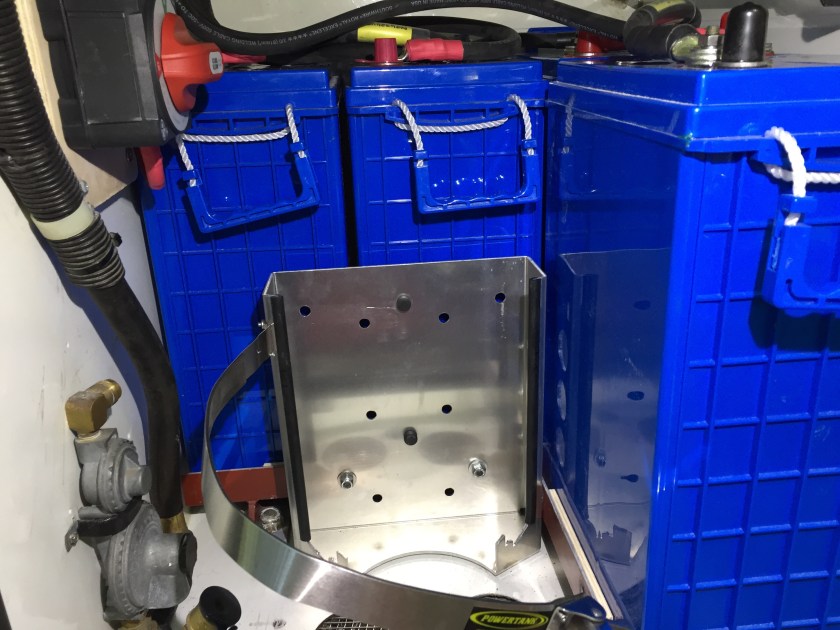
LP tank mounting bracket.
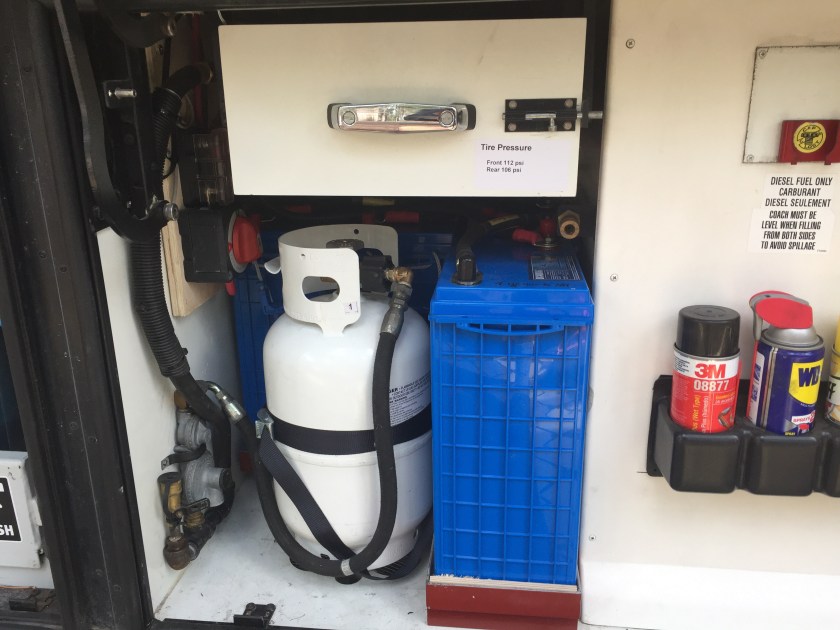
LP Tank in place, Drawer back in. The old LP lines really stink. I will replace them.
Feeding the Refrigerator/Front End Circuit.
The coach has a main 120 volt circuit breaker panel and a sub panel that can be switched from land line or generator power to inverter power with an automatic transfer switch. One of these sub panel circuits feeds the refrigerator as well as several other outlets, the Bose Stereo system, the front overhead spaces where the TV, BlueRay player, all of the DirectTV and satellite equipment is located and the coach PC and network equipment.
The new battery bank powers a Victron Phoenix 800 inverter. This is a very high efficiency pure sine wave inverter that is rated at 650 watts continuous and 1500 watts peak 120 volt output. I wanted this to feed part of the circuit described above, just the refrigerator and the front overhead equipment. The rest of the circuit would remain connected to the main inverter or the land line/generator. It took some doing to figure out where to split the circuit. There are lots of 120 volt wires that all look the same.
Once I figured out where to split the circuit I added a double pole double throw center off (DPDT) switch that lets me run the split part of the circuit from the Phoenix inverter or from the MultiPlus inverter (or land line or generator if they are available). After the DPDT switch the circuit needed to run through a circuit breaker and then on to the refrigerator and front end.
The refrigerator has no on/off switch so part of this circuit goes to a switch and outlet on the front face of the lower kitchen cabinets and from the switch back to an outlet under the kitchen cabinet into which the refrigerator and the cooktop (gas ignition) are plugged.
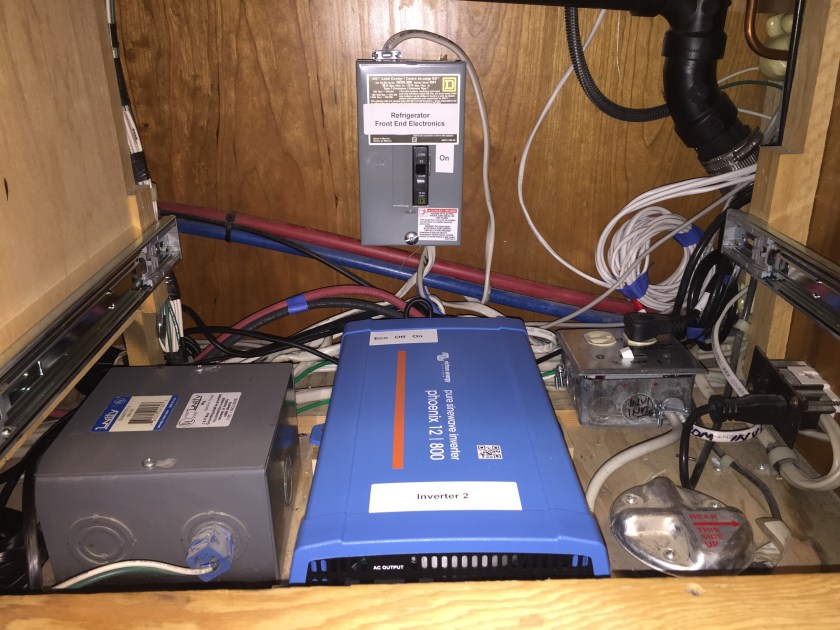
Lots of stuff under the kitchen cabinet. The Phoenix inverter, the panel and circuit breaker, the manual transfer switch and outlets. The round silver thing is part of the leveling system. I have yet to figure out what the gray box does. Some big relay thing.
This circuit continues up into the front overhead space and is branched again so that different parts of the entertainment equipment can be selectively turned on or off. The TV and BlueRay player are on one switch. All of the DirecTV and satellite parts are on another and the Bose equipment is on a third. Most of this stuff is on all the time if it has power. If we are in a very low power use mode then we can shut it all off and just turn on what we need. The other branch of this circuit powers the coach PC, router, ethernet switch, internet access device and mobile device chargers and then down to another outlet on the outside wall next to the driver's seat.
This gives us maximum flexibility in managing power use and distribution. Perhaps a bit of overkill but it works for us especially when we are in one place for a while and are only using solar and battery power.
Victron MultiPlus 12/300/120 inverter/charger.
The Victron MultiPlus inverter charger is mounted on the basement wall in the same place as the original Xantrex Prosine inverter. The Victron takes up less space on the wall but is about 4" deeper so it sticks out a bit more. This was a good thing because it forced us to take everything out of the basement and sort through all of it and repack it into smaller tubs that are easier to handle and find things in. The tubs are not so crammed full and they stack more efficiently in the basement. In the end we ended up with more useful space.
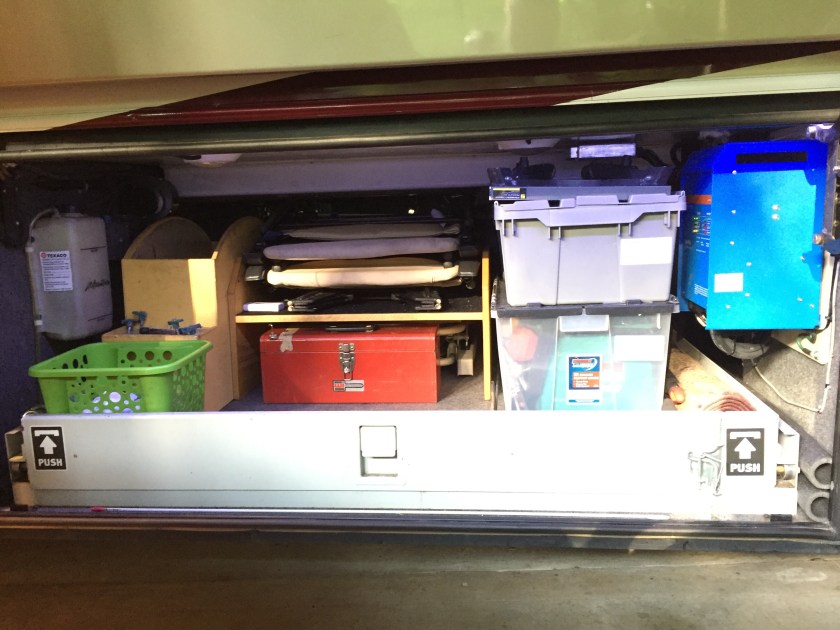
These new tubs are nice, three tall ones and six shorter ones, all the same width and length. They are all labeled too so we can find stuff. Well almost.
The MultiPlus uses a pair of 2/0 cables for the plus side and the minus side of the 12 volt connections. The original inverter used a single 3/0 cable pair. The MultiPlus can pull more amps from the batteries and charge more than the original so bigger wires were needed. Two 2/0 cables have a bigger copper cross section area than a single 4/0 cable and they are easier to snake through the space so that is what got used.
The existing 120 volt wire was sufficient so it got connected without any changes.
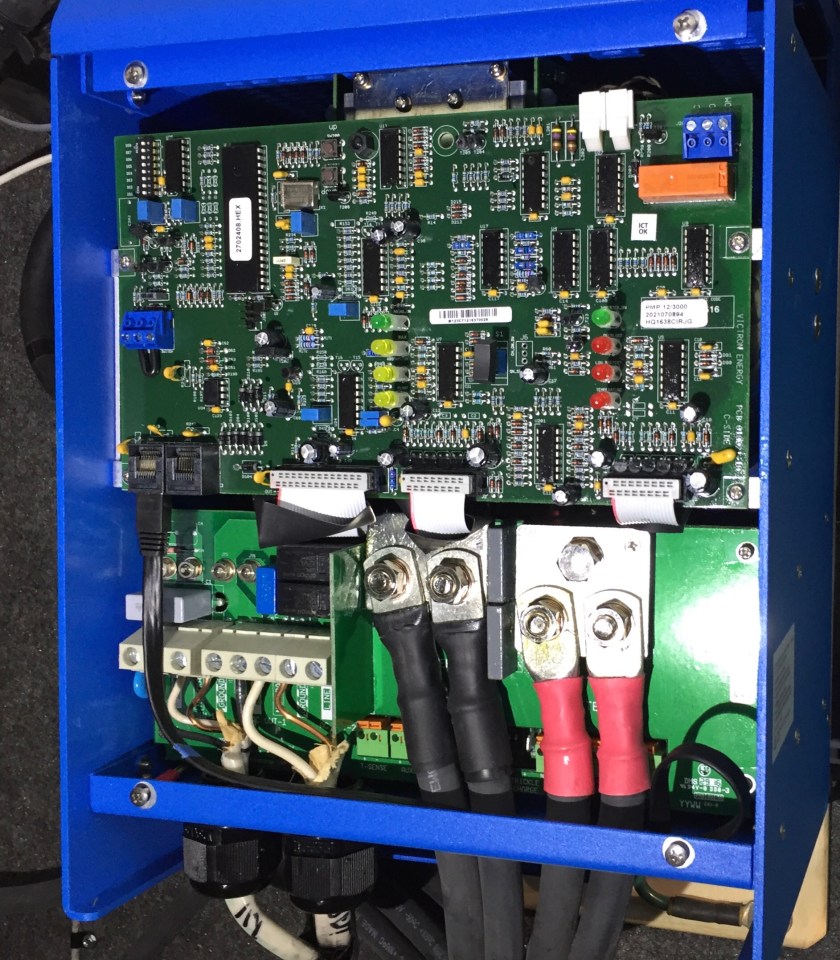
With the cover off the MultiPlus was very easy to work on. All of the connections are in front. You can see the two positive and two negative cables, each with its own connection point.
I just replaced another inverter with a new Xantrex inverter and I have to say this one was much easier to connect.
The MultiPlus has a built in transfer switch. When land line power or generator is available that power is sent to the coach. When it is not the inverter makes 120 V AC from 12 V DC and passes it to the coach. I elected to use the existing transfer switch in the coach. The way it is wired when the land line is connected or the generator is running up to 50 amps is available on the circuits that are powered by either the land line or the generator or the inverter. When there is no land line or generator power then it switches and uses the output from the inverter to power these circuits. The MultiPlus will transfer switch 50 amps as well but I would have had to run much bigger 120 volt wiring. Another choice.
There are always trade offs. If I used the Multiplus transfer switch then it has the capability to add 120 volt capacity from the inverter to that which is available from the land line. If you were connected to a 30 amp land line for example, and you wanted to be running the water heater and the AC at the same time you might be close to how much power is available from the 30 amp land line. If you start the microwave as well you might blow a circuit breaker but for that short time when the power needs exceeded the capacity of the land line, the charger side of the MultiPlus would back off and the inverter would add whatever was needed to make up the difference. Someday I may rewire the 120 volt loop for 50 amps so that the additive component available from the MultiPlus becomes available.
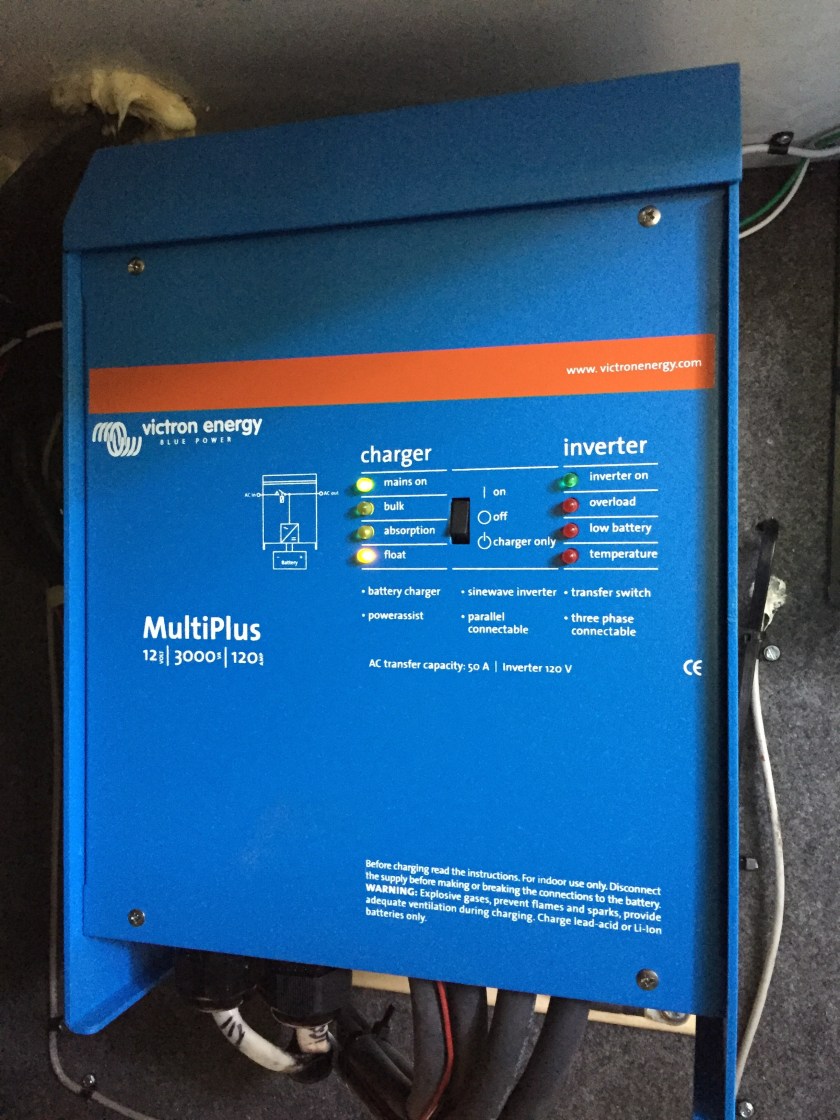
The Multiplus closed up and operating, batteries are at float.
Battery Charger.
I also added a second battery charger. This was initially to charge the start battery when we were connected to shore power or had the generator running. I sized it so that it could also charge the second house battery set. At 40 amps it is sufficient but a bigger choice would have charged the second house batteries faster. It has a display that shows what the current battery voltage and charge rate are.
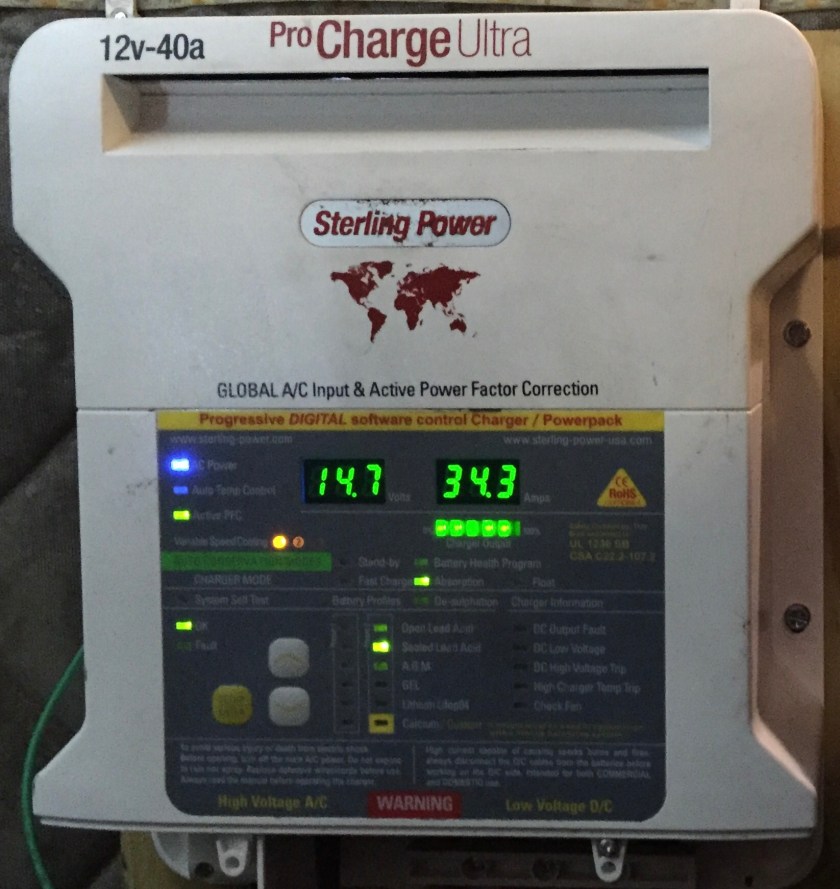
A smart battery charger, three independent outputs, each can be different battery types. Normally this is in a vented enclosure in the engine bay.
The charger display shows that the house 2 and start batteries are at 13.3 volts, a float level and being maintained with 1.8 amps into the seven batteries.
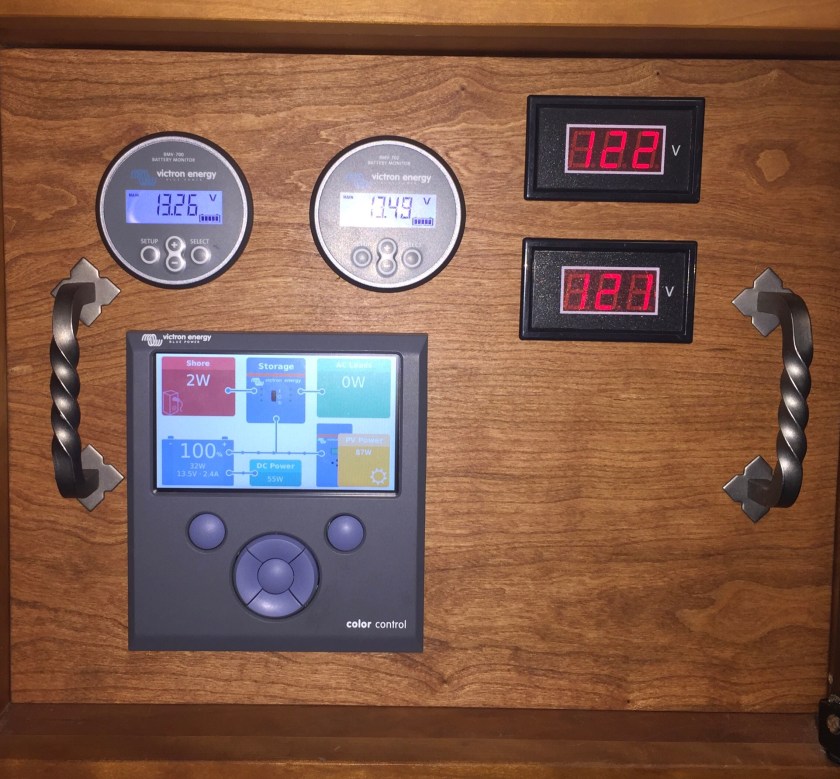
Monitor Panel.
Of course one wants to know what is going on. One of the best parts for the Victron product line is that almost all of the devices have communication links. They all come together at the Victron Color Control GX (CCGX). Each battery bank and the start batteries are monitored by connections to the shunts at the house battery sets and these connect to the CCGX. The solar charge controller, the MultiPlus inverter and the Phoenix inverter are all connected as well.
The CCGX is also connected to the coach computer network and through that to the internet. You can do all of the configuration programming on-line, store it on-line, update the CCGX on-line and log performance data on-line.
And it shows you in graphical form what is going on. Where power is coming from and where it is going. Very nice.
I also added digital volt meters that show the voltage on each leg of the incoming AC lines when you are connected to shore power or generator power. Another display in the bedroom closet shows how many amps are being drawn through each leg and if there are any connection errors.
The really hard part of this part was getting the data cables from where they come from to the space where the display panel is. They feed up from the basement into the refrigerator bay then up into the cabinet above the microwave. Then they feed through the space between the inside bottom of the cabinet and the outside bottom across over the sink, down over and up through the next kitchen cabinet and then into the cabinet where the display is mounted.
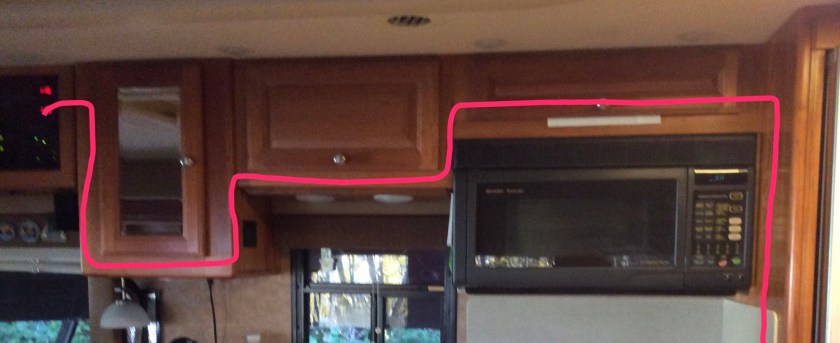
The data cables, internet cables, USB cables, and several pairs of spare cables meant about twenty wires made the trip through some very narrow passages.
The original display panel was attached from the inside, a very difficult place to get hands and tools. I remade the mounting so that the new book-matched, 3/8" solid cherry panel is fixed in place with velcro. A pair of handles helps pull it out for easy access to the pile of wires behind.
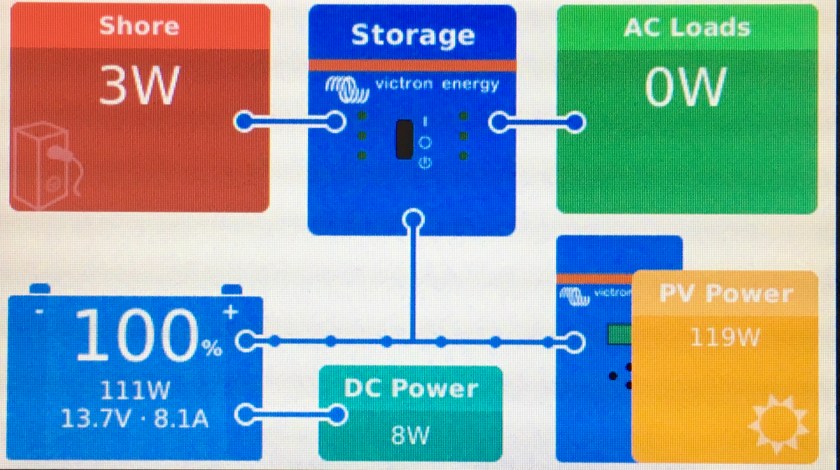
Typical CCGX display. The batteries are at 100%. The charger is idle. Solar is feeding 119 watts into the batteries. 8 watts are being consumed by 12 volt devices. 111 watts are maintaining the batteries at float. Only 2 watts are being consumed by the Multiplus in idle mode.
Results.
All is working as expected. Of course every bit of it got tested along the way as it was installed and adjustments were made as needed.
The solar panels are putting out an astounding amount of power. Even in the shadow of trees and a cloudy day they are adding more than the refrigerator uses. Our best day so far was in a sunny campsite on a clear day, more than 5.2 KW into the batteries. 20-25% of the max possible is still going to be about 2.1 KW which is what I was using as a planning point. This is more than enough to run the refrigerator and our other loads with some care for four or more days without any generator support. We spent a week at Madison in Yellowstone and ran the generator once for two hours. We need lots more time and experience with this to know how to balance loads and get the best results.
Our Lifelines are six years old, not dead but not new by any means. Replacing them now gets them included in the "solar project". With a different battery rack and some repositioned water drain lines there is room for four of the L16 batteries for 830 amp hr capacity or four or maybe even six of the Fullriver DC335-6 batteries (same footprint as the L16s, shorter) for 670 or 1005 amp hrs capacity. In a few years Lithium batteries should be much cheaper. They may be an option for the next battery cycle.
More projects ahead — after I finish the bathroom built-in cabinet. It is much closer to being finished now than when we got home in April. Really.
More later,
Roger and Susan (the editor)
Editors note: I think my head just exploded after proofreading this post


 The Amazing Cat Band's and Cat Circus's coach was at HWH for some work too.


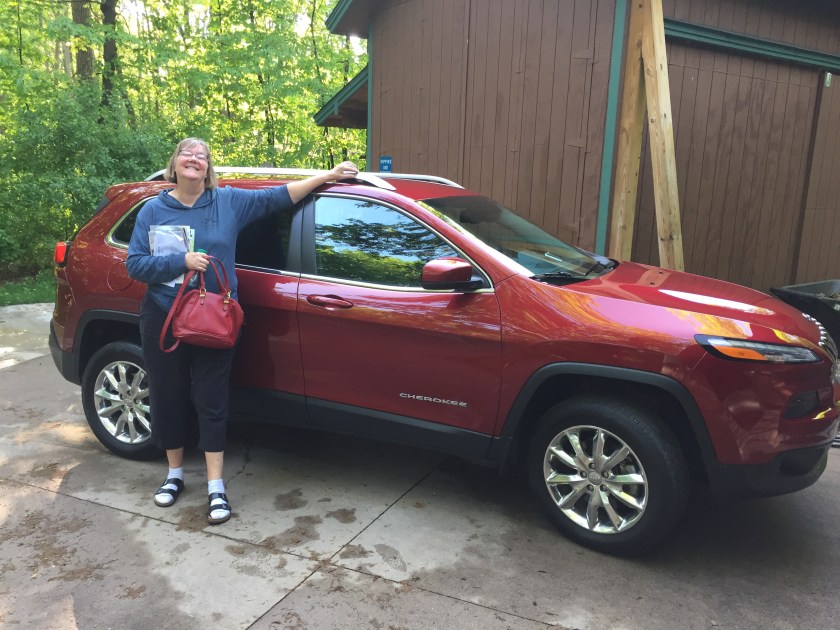 Susan and the Jeep Cherokee
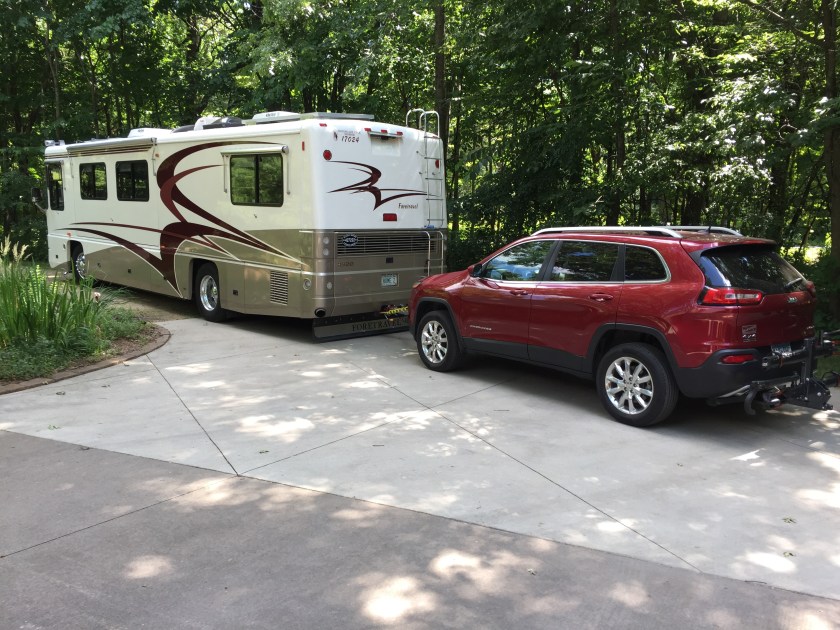 Coach and Jeep Ready to Go